How To Fix A Leaky Outdoor Faucet Handle? Leaky outdoor faucets can be an inconvenient nuisance, leading to wasted water usage and possible property damage. But don’t despair: fixing leaky outdoor faucets is an achievable task with some know-how and basic tools at your disposal. No matter if you’re an experienced DIY enthusiast or new to home repairs-this guide will walk you through how to address that pesky leak! By following its easy steps you will save both money And water while enjoying fully functional outdoor faucets again-so let’s roll up our sleeves and jump head first into outdoor faucet maintenance head first!
Understanding The Problem
Before beginning repair of an outdoor faucet handle that leaks, it’s essential to first ascertain its source. In many instances this problem lies within either its packing nut or washer which over time becomes worn due to exposure and usage, eventually leading to leakage. Sometimes a loose or damaged handle might also be contributing to it-by carefully inspecting and identifying its specific source, you’ll be better prepared to carry out necessary repairs more effectively.
Gathering Tools And Materials
As part of your goal to repair your leaky outdoor faucet handle, ensuring you have all of the required tools and materials is essential to address its underlying cause. Be sure to obtain an adjustable wrench Phillips-head or flat-head screwdrivers, pliers, reliable Teflon tape roll and replacement packing nuts/washers will allow for successful repair work on time. With these essentials ready at hand, It should soon return to its optimal working state!
Shutting Off The Water Supply
Before beginning to repair an outdoor faucet, the first essential step should be turning off its water source. Locate and close the water shut-off valve close to or within your house; turn it clockwise until fully closed to stop its flow – this action prevents leaks or splashes during repair and ensures a safer working environment. Open up the faucet to drain any excess water from its lines to further minimize potential spillage issues and proceed confidently toward fixing that leaking handle! With your water source off securely, now’s the time for fixing it leak!
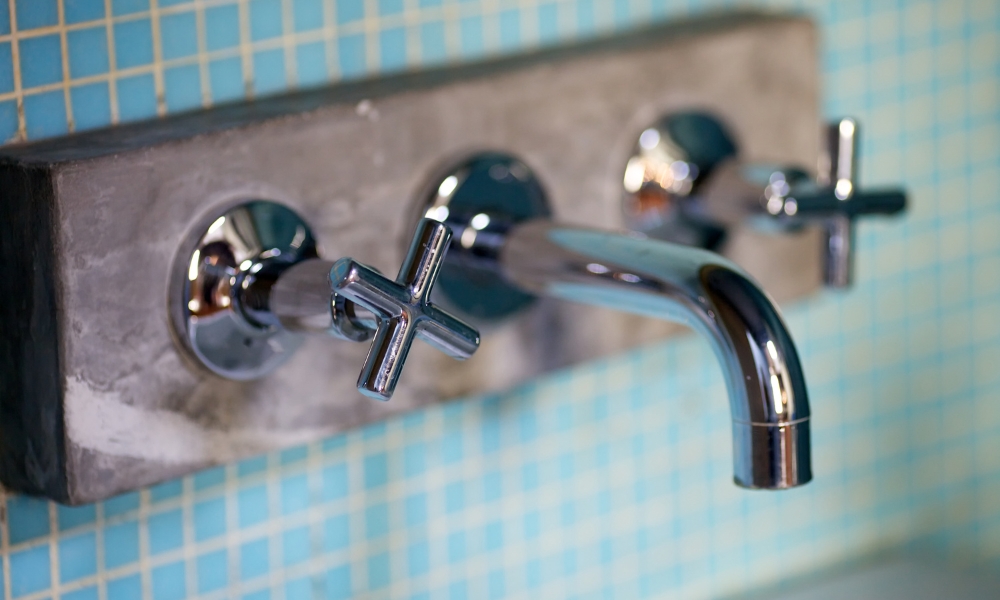
Dismantling The Faucet Handle
Once the water supply is under control, the next step in dismantling a faucet handle to locate the components that cause leaks is disassembling its handle to access its components. Employing an appropriate screwdriver, remove any visible screws on the handle before gently detaching it revealing the valve stem and adjustable wrench with a packing nut loosening tool to access under it a washer that often causes leakage – remove this washer carefully to inspect for signs of wear or damage before detaching handle and inspecting valve stem for signs of leakage source – uncovering its components’ causes before beginning restoration or repair efforts can begin in earnest.
Inspecting And Replacing O-rings
As part of your efforts to fix an outdoor faucet handle that leaks, a key step is inspecting and possibly replacing its O-rings. These small rubber rings create a watertight seal within the assembly, so removing and inspecting these O-rings carefully using pliers or a flathead screwdriver can help – carefully examine them for signs of wear, cracking, or deterioration that could contribute to leaks – before replacing them with brand new O-rings that match in size and type (this meticulous inspection and potential replacement can help resolve leak issues and ensure watertight seal once more). This thorough process could play a pivotal role in solving leak issues while ensuring a watertight seal once again!
Checking And Replacing Washers
It is crucial that you shift your focus toward inspecting and possibly replacing washers. These small yet vital components help prevent leaks by creating an airtight seal within the faucet assembly. Carefully unbolt worn or damaged washers with pliers or a screwdriver and inspect for cracks or tears in their exterior fabric – should any issues be found, it would be prudent to replace them with one that meets specifications immediately. By conducting such thorough checks and making necessary adjustments you’ll take great strides towards solving leakage while also restoring functionality in your outdoor faucet assembly assembly.
Reassembling The Faucet Handle
Once your inspection and replacement of key components are complete, the next step in reassembling your outdoor faucet handle can begin. Start by gently fitting a new or refurbished washer or O-ring onto the valve stem until a snug fit is achieved. Reconnect the packing nut using an adjustable wrench and tighten it securely being careful not to over-tighten it as this could damage it further.
Carefully position the faucet handle onto the valve stem, aligning it with its screw holes. Insert and tighten screws using an appropriate screwdriver until they are snug but not overly tight, then gradually turn back on the water supply until all tests have passed successfully to evaluate repair work. Finally step-by-step reassembly ensures it handle can resume its leak-free functionality.
Testing The Repairs
It has been reassembled, testing the repairs becomes a critical stage. Gradually open up the shut-off valve you closed earlier; observe for any signs of leakage around its handle and base as water flows slowly into it. Pay particular attention to areas you addressed during repair process as you watch for leaks around those components that were tightened or sealed during assembly-this phase should ensure your efforts to address leak issues have proven their worth!
Common Mistakes To Avoid
While attempting to repair an outdoor faucet handle, it’s crucial that you remain mindful of potential pitfalls which could compromise the process and lead to further leaks or damage. One such mistake is overtightening screws, packing nuts, and valve stems which may lead to further leakage if overdone. Failure to use Teflon tape when reassembling can compromise seal integrity and lead to leaks. Ignoring components such as valve seats can reduce the effectiveness of repairs and rushing through the assembly without checking alignment can create further problems. By remaining attentive and avoiding these potential pitfalls your repair efforts can become successful and lead to a lasting leak-free solution.
When To Seek Professional Help
Fixing an outdoor faucet handle leak may seem like an easily manageable DIY project but sometimes professional assistance may be wiser. If you encounter difficulty pinpointing its source or don’t possess the necessary tools or skills for repair or continue experiencing leakage despite your efforts professional assistance may be wiser. Complex issues involving internal plumbing systems or extensive damage may require professional advice beyond what can be accomplished without expert help; additionally if working with water supply lines is intimidating or you feel uncertain how best to approach handling potential complications a trained plumber can ensure a safe and successful resolution which ultimately saves both time effort and any further potential further damage that might otherwise ensue.
Maintenance Tips For Preventing Future Leaks
Preventing future leaks in your faucet handle involves adopting preventative maintenance practices to extend its lifespan and limit any potential issues. Regularly check for signs of wear such as rust or corrosion and address any minor leaks before they worsen. Applying a light coating of the plumber’s grease can help ensure smooth movement and prevent leaks caused by friction-related leakage. When colder months arrive be sure to drain and shut off water supplies properly to avoid freezing and damage to water pipes. An investment in a faucet cover or insulation will add another layer of protection from the elementsp rolonging leak-free functionality for years to come. By including this practice in your maintenance regimen you can protect both and enjoy leak-free functionality over time.
Conclusion
You can resolve a leaky faucet handle by carefully observing the issue, using the right tools and following systematic repair steps. Begin by shutting off the water supply, then disassemble the key components for inspection. Reassemble them with precision and thoroughly test the repairs while staying alert for common mistakes. If needed seek professional assistance. By combining your repair efforts with proactive maintenance you will soon experience durable leak-free outdoor faucet handles for years to come!